


Intra aortic baloon pump (IABP)
Overview
Purpose
-
The IABP provides temporary support to the hearts left ventricle. The IABP is a device that rapidly shuttles helium into and outa polyurethane balloon.
-
Helium is used as it is low density and thus diffuses rapidly.

Insertion and position of balloon
-
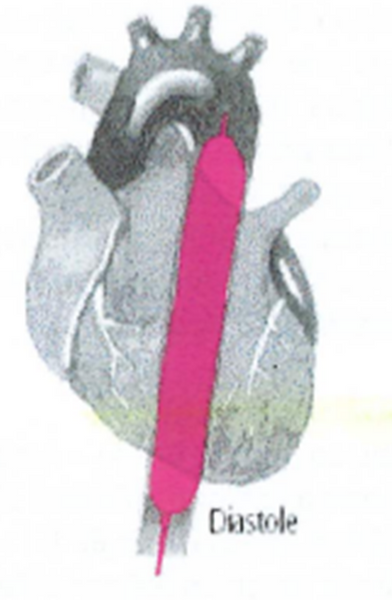
An IAB is usually inserted through the femoral artery and is positioned along the descending aorta with its tip just distalto the left subclavian artery and with the proximal end positioned above the renal arteries.
-
Incorrect sizing can result either ineffective counterpulsation or possible mechanical trauma to the aorta.
Effects of IABP
-
Decreases left ventricular afterload (AEDP)
-
Decreases aortic systolic blood pressure
-
Decreases pulmonary capillary wedge pressure
-
Decreases LV volume
-
Decreases LV EDP
-
Increases coronary blood flow
-
Increases cardiac output
Indications
-
Cardiogenic shock
-
Weaning from bypass surgery
-
Pre-op support for high risk cardiac surgery
-
Support during PCI
-
Mechanical complications due to AMI
-
Unstable refractory angina
-
Refractory ventricular failure
Contraindications
Absolute
1. Dissecting aortic aneurysm
2. Aortic regurgitation (severe)
Relative
-
Irreversible brain injury- -to reserve Organs for donation/implant
-
End-stage diseases
3. Severe aortic or femoral atherosclerosis or PVD
4. Abdominal aortic aneurysm
5. Severe coagulopathy
Complications
During Insertion
-
Aortic/femoral wall dissection
-
Plaque embolus
During Pumping
-
Ischaemia -most common complication ( due to vascular occlusion/improper placement of IAB)
-
Catheter abrasion
-
Embolus or thrombus
-
Infection or bleeding
During or after removal
-
Bleeding/haematoma
-
Catheter entrapment
-
False aneurysm
Timing
Inflation
Balloon inflates at onset of diastole during isovolumetric relaxation (>90% coronary perfusion) just before the aorticvalve closes (diachrotic notch).
-
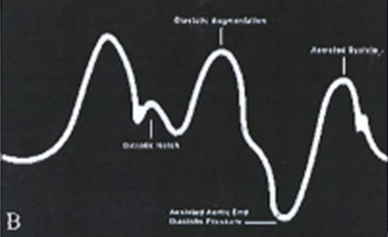
Increases aortic diastolic pressure (augmented pressure)
-
Improves coronary, carotid and renal artery perfusion.
-
Improves Oxygen supply to heart, brain and kidneys
Deflation
Balloon deflates at beginning of systole during isovolumetric DBP contraction when LV is building up pressure to open the aortic valve (just prior to aortic valve opens).
-
Deflation reduces aortic pressure (vacuum effect)
-
Reduces afterload (AEDP), which
-
Reduces LV workload
-
Reduces myocardial ventricular O2 consumption
-
Increases cardiac output

IABP rules of the waveform
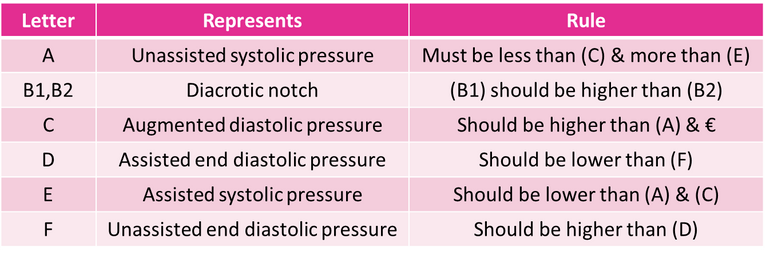
1. Unassisted Systolic BP (A) > Assisted (balloon deflation) Systolic BP (E)
2. Augmented (balloon inflation) Diastolic BP (C) > Unassisted Systolic BP (A)
3. Unassisted End Diastolic BP (F) > Assisted (balloon deflation) End Diastolic BP (D)
4. Diachrotic r notch on balloon inflation (B1) > Diachrotic notch without balloon inflation (B2)
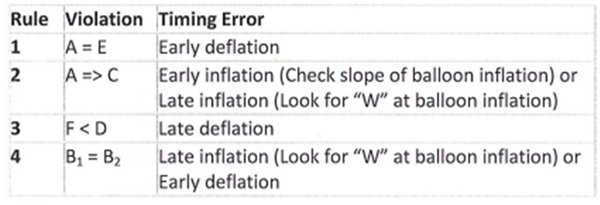
Early inflation (A)
The inflation point lies before the diachrotic notch.
• Premature closure of aortic valve
• Reduces stoke volume/cardiac output
• Increase in LVED volume
• Increases in LV wall tension

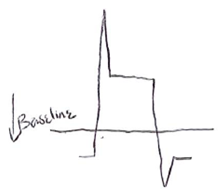
Late inflation (B)
With late inflation, the diachrotic notch precedes the inflation point, and the notch and the inflation point create a W shape.
-
Augmentation is less than optimum
-
Decreased perfusion pressure and volume to coronary arteries
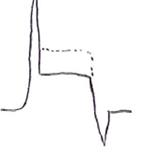
Early deflation (C)
With early deflation, a U shape appears and peak systolic pressure is less than or equal to assisted peak systolic pressure.
• No afterload reduction

Late delfation (D)
With late deflation, peak systolic pressure exceeds assisted peak systolic pressure.
•Increasing afterload
•Increasing myocardial oxygen consumption
•Increase cardiac workload
• Increase preload

Triggers
The pump needs to synchronise balloon movemnent with the patient's heart beat. A trigger is the signal to help to the pump recognise the cardiac cycle. Aortic pressure waveform can be used as a trigger but ECG is the preferred trigger.
ECG I the precursor of mechanical events in the cardiac cycle and is reliable in arrhythmias.
Choosing an appropriate ECG channel (leads 1, H or l) is crucial. Good quality signals are critical (minimal artifact). Select lead with unidirectional QRS, where the R wave is > than p waves and t waves.
Pattern
-
Heart rate <130bpm
-
QRS duration <130ms
-
Regular rhythm
Peak
-
Heart rate >130bpm or
-
QRS duration >130bpm
-
Regular rhythm
Afib
-
Any heart rate with arrhythmia (AF/trigeminys/bigeminys, etc)
A Pace trigger
-
Uses atrial pacing spike as trigger signal
-
A pace only
-
Must be 100% atrially paced
-
Do not use if AV or V paced
-
y Only used if pacing spikes interfere with R wave detection -always troubleshoot ECG first
V Pace trigger
-
Uses ventricular pacing spike as trigger signal
-
May be used with V and AV paced rhythms
-
Must be 100% ventricular paced
-
y Only used if pacing spikes interfere with R wave detection
Pressure (Ao) trigger
-
Uses the systolic upstroke of the arterial pressure waveform as the trigger signal
-
Used when no reliable ECG trace
-
Not recommended in irregular rhythms (because stroke volume varies, this will not be activated for lower stroke volumes)
-
Best during cardiac arrest and defib rillation-- CPR willgenerate AP to trigger
Internal trigger
-
Used when no cardiac output and no ECG
-
Used in operation theatre during bypass
-
Asynchronous- fixed rate regardless of patient activity
-
Never remain in internal trigger mode if patient has a cardiac output
Waveform
Normal
-
Zero baseline
-
Balloon pressure baseline
-
Rapid inflation
-
Peak inflation artefact
-
Balloon pressure plateau (IAB fully inflated)
-
6. Rapid deflation
-
Balloon deflation
-
Return to baseline

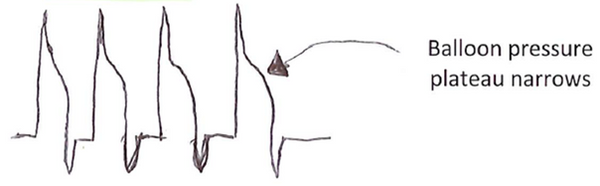
Changes in heart rate
-
Variations in heart rate affect the width of the balloon pressure plateau. Note: if the width of the balloon pressure
-
plateau isn't consistent with the patient's heart rate, there may be a significant error in timing
Bradycardia
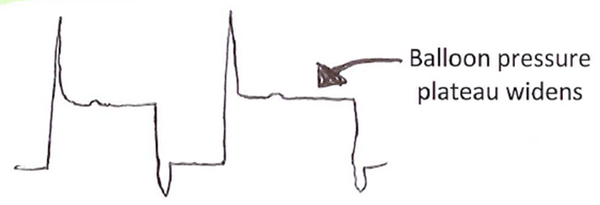
Tachycardia
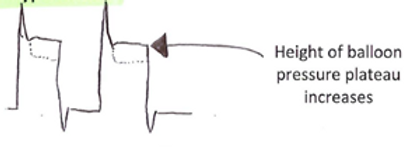
Changes in blood pressure
-
Variations in blood pressure affect the height of the balloon pressure plateau
Hypotension
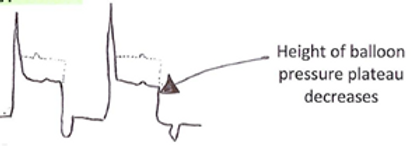
Hypertension
Abnormal IABP waveforms
Abnormality
-
Low balloon pressure plateau (<20mmHg than augmented P)
Causes
-
Hypotension
-
Hypovolemia
-
Low SVR
-
Balloon too small or low inflation volume
-
Positioning too low in aorta
Abnormality
-
High balloon pressure plateau (>20mmHg than augmented P)
Causes
-
Vasoconstricted (Hypertensive/cold)
-
Balloon too large
-
Restriction of gas flow in system/kink
-
Incorrect position (too low)

Abnormality
-
Balloon pressure baseline depression
Causes
-
Helium leak (tubing or connections)
-
Inappropriate timing settings/arrhythmia/tachycardia or frequent ectopics
-
Mechanical defect/kinked catheter
-
Blood in catheter tubing
Abnormality
-
Balloon pressure baseline elevation
Causes
-
Restriction of gas flow
-
Over-pressurized gas in system

Machine
Checking the IABP machine
Helium
-
Turn on balloon pump by switching power button on.
-
Twist He tank on to check amount of He in tank. Balloon volume is displayed in the bar graph in the bottom right hand corner of the screen.
-
If tank is <25%, the tank should be changed.
-
When switching off the He tank, check if there is any fluid in the bottle behind the tank, and empty.
-
The tank can be removed by simple rotation.
-
Without the He can connected to machine, the leftover Helium in the machine can last 20 minutes.
ECG
-
Ensure an ECG cable (5 lead only) and transducer cable is connected to machine.
Extra
Ensure that there is a spare
-
He tank
-
saline bag
-
pressure bag
-
transducer
-
balloon (30 and 4cc)
Setting up the IABP
-
Sit saline bag in pressure bag and pierce saline bag with sharp syringe part of transducer, by removing the blue twisty tab from saline bag and clear cap off syringe
-
Ensure the syringe is inserted in tightly and that no part of the syringe is touched (sterile).
-
Inflate pressure bag by opening the pressure cable to the pump, and inflate bag until a pressure between the green-red zone is made.
-
Ensure to close pressure cable when done.
-
.Flush transducer line to remove all bubble by squeezing the plastic nobules on the transducer box, flushing out of both lines.
-
Turn both lines off when done.
Setting up the fibre optic
-
Turn IABP machine ON.
-
Fibre optic sensor (FOS) is then handed to us (do not touch FOS on end-may cause damage to sensor) and inserted into FOS connector until a click is heard (writing towards you).
-
Plug cal key in for any direction. This will automatically calibrate, taking ~15seconds (green light bulb and 4 beep tone indicated successful zeroing/calibration. If doesn't work, take FOS key out and re-insert. If does not work again, catheter can be used as generic catheter- switch pressure to pressure transducer.
-
The nurses then prepare the catheter and proceed to connect to patient.
-
If the calibration process is done while the catheter is inside the body, choose AP select, fibre optic, FOS map and use the arrow keys to put in the approximate MAP from hemo system.
Setting up the ECG
-
Attach ECG dots on patients, connect leads and put tape over the electrodes, so electrodes are not removed.
-
plug ECG cable into ECG on balloon pump.
-
When machine is turned on ensure SKIN is selected on the keyboard.
-
Choose the ECG lead with the largest and most clear R wave
-
For 3-lead cable choose 1, I1 or IlI
-
For 5-lead cable choose l, Il,iIl, aVR, avl, aVF or V.
Connecting to the patient
Zeroing the transducer
-
Ensure transducer is along plebostatic axis
-
○Open transducer to air and select "AP select" (left hand side of screen) and press "zero transducer" (bottom of screen' uoou
-
Turn tap off to air and on to patient
Starting up the balloon
-
Balloon plug is handed to us from nurses and can be plugged in IABP at "balloon""
-
Purging process can be done when told to, by pressing "stand by" (let side of screen).
-
If purging process successful, "on" can be pressed to turn the balloon on.
Manual Set-up
-
The FOS is "good" at analysing signals and selects appropriate timing and modes automatically. It does this by analysing 3 cycles of 9 beats (pauses in balloon pump means it's reassessing signal or timing). Timing is reassessed every 64'" beat.
-
• If FOS is not working, and regular transducer is required, or FOS seems inaccurate, switch to manual mode.
-
Hit "mode" (left hand side) to change to operator mode,
-
Based on the patients rhythm, choose the appropriate trigger by selecting "trigger" (right hand side of screen) and selecting the trigger down the bottom of the screen.
-
. Use "assist ratio" buttons (bottom right hand corner) to change to 1:2, to assist in determining appropriate timing. Inflate (left) and deflate (right) buttons can be used to change timing. Switch back to 1:1 when happy.